You’ve done all the preparation, and it’s now time to start your beehive! This article will discuss the steps needed to set up your beehive and what a typical process looks like. A typical process for setting up your beehive tends to look like this:
- Choose a location for your beehive
- Gather the suitable tools
- Assemble your beehive
- Paint or varnish the beehive (if needed)
- Stacking up the boxes
- Add the frames
- Installing the bees in the hive
Choose a location for your beehive
When choosing a location for your beehive, make sure to consider the hive should be in a sunny spot that receives at least 6 hours of direct sunlight per day. If possible, face your hive south or southeast to maximize the amount of sunlight it receives.
The hive should also be near a water source, as bees will need to drink water daily. Avoid placing your hive near any areas that could be perceived as a threat by the bees, such as busy roads or predator animals.
The location should be sheltered from strong winds and away from any areas where there may be a lot of human activity, such as a playground or a busy street. You’ll also want to ensure the hive is not close to any areas where pesticides are sprayed, as this can harm bees.
Furthermore, make sure to place your hive somewhere close to flowers or other plants, as bees will need access to nectar and pollen.
Gather your tools
When assembling a beehive, you will need specific tools and supplies. To set it up correctly, you will need the following items:
- beehive (duh!)
- hive stand
- honey frames
- inner cover
- outer cover
- bee escape
- smoker
- bee brush
- feeder
- hammer
- wood glue
- saw
- carpenter square
- screws
Make sure to read the instructions with your beehive kit carefully, as each type of hive will have its own specific assembly instructions.
Assemble your beehive
Once you have gathered your tools, it’s time to start assembling it. Most beehives come in kit form and will include all the necessary parts and instructions. If you are starting with an assembled hive, you will just need to put it together.
In a majority of the beehive kits, they will have a bottom board, which is the foundation of the hive. The bottom board will have either an opening or a slot for the bees to enter and exit the hive. It also has a place for the frames, which hold the comb where the bees store their honey.
It will also contain boxes and frames on which the bees will build their comb on. The boxes and frames are typically made of wood, plastic, or metal. The type of material you use is up to you, but make sure to choose something that is durable and will last a long time.
You need to put together the boxes from the beehive kit, which will serve as the home for the bees. Once you have built a basic frame, the boxes, the foundation, and the bottom board, you will need to add the inner and outer covers.
The inner cover has a hole in the center for the bees to enter and exit the hive. The outer cover is placed over top of the inner cover and helps protect the hive from bad weather and predators.
Paint or varnish your beehive
Once your beehive is assembled, you’ll want to give it a fresh coat of paint. This will help protect the hive from the elements and make it easier to spot any problems. Choose a light-colored paint, so it doesn’t absorb too much heat from the sun.
If you decide to varnish your beehive, make sure to use a natural beeswax varnish. This will help the hive breathe and also make it easier for the bees to attach their wax comb to the hive.
Stacking up the boxes
Once you have assembled and painted your beehive, it’s time to add the boxes. The brood chamber is the box where the queen will lay her eggs. The brood chamber will typically have ten frames.
After adding the brood chamber, add the honey super, which is the box where the bees will store their honey. The honey super will typically have eight frames.
Add the inner cover to the hive. The inner cover has a hole in the center that allows bees to enter and exit the hive. Finally, add the outer cover to the hive. The outer cover protects the hive from inclement weather and predators.
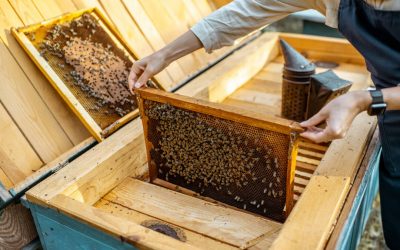
Adding the frames
The next step is to add the frames to the hive. Make sure to use wood glue to secure the joints. You will also need to use screws to secure the frames to the hive. Once the frames are in place, you can add the bee escape and the feeder.
The bee escape is a one-way door that allows bees to exit the hive but not re-enter. The feeder is a device that allows you to add sugar, water, or pollen to the hive.
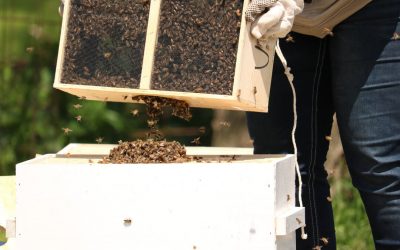
Installing your bees in the hive
Bees can be ordered online or through a local beekeeping club or association. Keep in mind the type of bees you order, as there are different types of bees better suited for different climates.
When your bees arrive, they will usually come in a package. A queen bee, worker bees, and drones will be included in the package. The queen bee is the sole fertile female in the hive and will lay all of the eggs. Worker bees are sterile females who do all of the hive work, such as collecting pollen and nectar, constructing wax comb, and caring for the young. Drones are male bees that only exist to mate with new queens.
Once you have your bees, it’s time to introduce them to their new home. To install your bees in their new hive, remove the queen bee from the package and place her in the hive. Next, add the frames of the beeswax comb into the hive. Finally, add the rest of the bees into the hive.
Once the bees are in their hive, make sure to keep an eye on them for the first few days. This is to ensure they are getting settled into their new home and everything is going well. After a week or so, you can begin checking on them regularly as part of your beekeeping duties.
How to build a top bar hive
Another type of beehive is the top bar hive. This type of hive is easier to build than a Langstroth hive, but it is not as common.
To build a top bar hive, cut the top bars to the correct size. The top bars will serve as the frames for the hive. Then, cut the end bars and the bottom bar to size. The bottom bar will serve as the base of the hive.
After cutting the bars to size, use wood glue to attach the top bars to the end bars. Make sure to leave space between each top bar for the bees to build their comb. Once you have attached all of the top bars, use wood glue to attach the end bars to the bottom.
Then, add the inner cover and the outer cover to the hive. The inner cover has a hole in the center that allows bees to enter and exit the hive. The outer cover protects the hive from inclement weather and predators, just like you would with the Langstroth hive.
You’ve set up the beehive — now what?
Now that the beehive is assembled, you should leave it alone. The bees will do the rest! They will construct a comb, store honey, and pollinate or fertilize your plants. To inspect the hive, use a hive tool to pry, expand the hive and look inside. A hive tool is a tool used to carefully remove wax and prop open the frames of a beehive.
If you need to harvest honey, you can use a bee brush to gently remove the bees from the comb. Then, use a hive tool to pry the comb off of the frame. Finally, use a strainer to strain the honey into a jar.
If you find that the hive is not doing well, there are a few things you can do to help. For example, you can add a queen excluder to the hive. This is a device that allows the queen to enter and exit the hive, but it prevents her from laying eggs in the honey super.
You can also add a frame of brood comb to the hive. This is the comb that contains eggs, larvae, and pupae. The brood comb will help the hive to rebuild its population. Finally, you can feed the bees sugar syrup or pollen patties. Sugar syrup is a mixture of sugar and water that provides the bees with energy. Pollen patties are made of pollen and provide the bees with protein.
If you need additional help getting started or managing your beehive, be sure to read our beekeeping guide.
How long will a beehive last?
A beehive can last for many years, but it will eventually need to be replaced. The frames in the hive will become warped, and the comb will become thin. When this happens, it is time to replace the hive.
Final thoughts
Be sure to follow the instructions in this article carefully to ensure that your hive is built correctly. It’s important to keep in mind the different types of beehives available so that you can choose the one that is right for you. They also require specific tools and materials you will need to gather before building. Once your hive is built, you can add bees and start your journey into beekeeping!